
Whiny Wednesday: How To Make An Honest Diaper Cake
Hiya, sweet thangs. How’s your (short!) week going? I guess if you’re a stay-at-home mom like me it’s same ol’ right? Well, except for the fact that little C is on summer break from his Mother’s Day Out, so mama’s days out are actually numbered and her days in are a little
crazy right now. 🙂 Counting down ’til vacay! No, really. I’m truly enjoying being at home with both kids this summer because it’s the last summer before little C goes off to official preschool and it’s so. so. sad. So I’m glad I had another to go through this sweet baby stage ONE last time (you heard me). Wink.
Now, guess what? One of my neighbor friends who has a little boy just months apart from little C is expecting in a few weeks. Cool, right? We’ll have babies to play together yet again! She’s expecting a little boy, so when I found out we ordered way too many (and unfortunately opened them all so no exchanges…thanks, little C) of our cute lil’ Honest diapers, I decided to do something fun and make her a diaper cake! (Err, and when I say we ordered too many, we’re talking hundreds. These are the designs that could pass as boy…the girl designs went to the school and a family friend.)
Granted, Honest sells some amazing diaper cakes on their site and it’s way easier to just
order one of those, but where’s the fun in that?! So if you wind up with extra diapers or just extra time on your hands (um, yeah…it took me about a month to find time to gather the tools and all of 10 minutes to put it together), here’s how it goes…
What you need?
*Lots of cute Honest diapers! (Click over to Honest.com to order!)
*Plenty of medium (or small) rubberbands
*Three large rubberbands (you can find these in an office supply store)
*Colored ribbon
*Two dowel rods
*A fun topper
*Scissors
*Tape
*optional: something firm to place it on if you’re going to deliver it
How to create it?
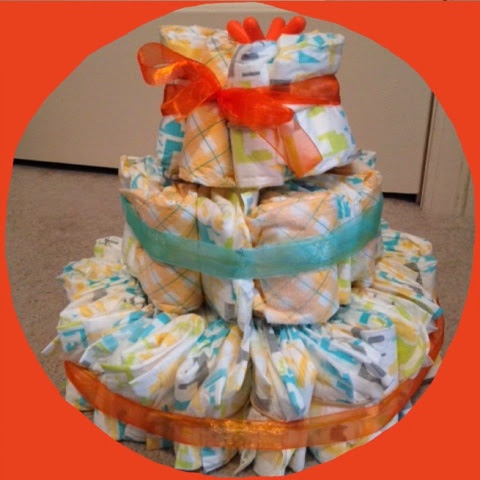
1. Make the top layer. Fold about five diapers (from top to bottom…I used newborn, but you can use whatever) and secure each one with a smaller rubberband. Place them in a circle, and insert a couple more diapers just like that in the center. Use a larger rubberband around it all to keep it together. You can also leave room for a fun topper like I did (I used a Comotomo teether!)
2. Make the middle layer. You basically do the same thing here, just more diapers. You’ll need about four or five for the center, then use about 15 around them. You’ll need to secure the entire layer with a large rubberband.
3. Make the largest, bottom layer. Use about seven or eight diapers in the middle. Secure those with a large rubberband first, then place about 30 diapers around it and secure them to it with a large rubberband. You’ll need someone else nearby to help you hold the diapers while you put the rubberband on. In my case, it was little C and he did an outstanding job!
4. Place the middle layer on top of the bottom, then the smallest top layer on top. Take the two dowel rods and feed them through the layers (careful not to feed them inside the actual diapers), holding them together (you might have to trim them, although I was too lazy).
5. Measure and cut your ribbon to go around each layer. Tie a bow, or tape them.
6. Voila! Masterpiece. And you can add fun little animals or designs from the craft store, I just ran out of time…blush. Hey, I’m proud I made it this far at my first attempt!
Hope you like it?

Share the post "Whiny Wednesday: How To Make An Honest Diaper Cake"


May 29, 2014 @ 12:33 am
How cute is this? I'm totally trying my hand at it the next time I have a baby shower to go to!